android.support.design 学习笔记
在appcompat 22 的时候,google带来了Support Design,成为实现MD的利器,最近因为要开始使用这个库,稍微过了下库的内容.
这次主要通过讲解当前界面是怎么实现的.来学习这个库.
布局
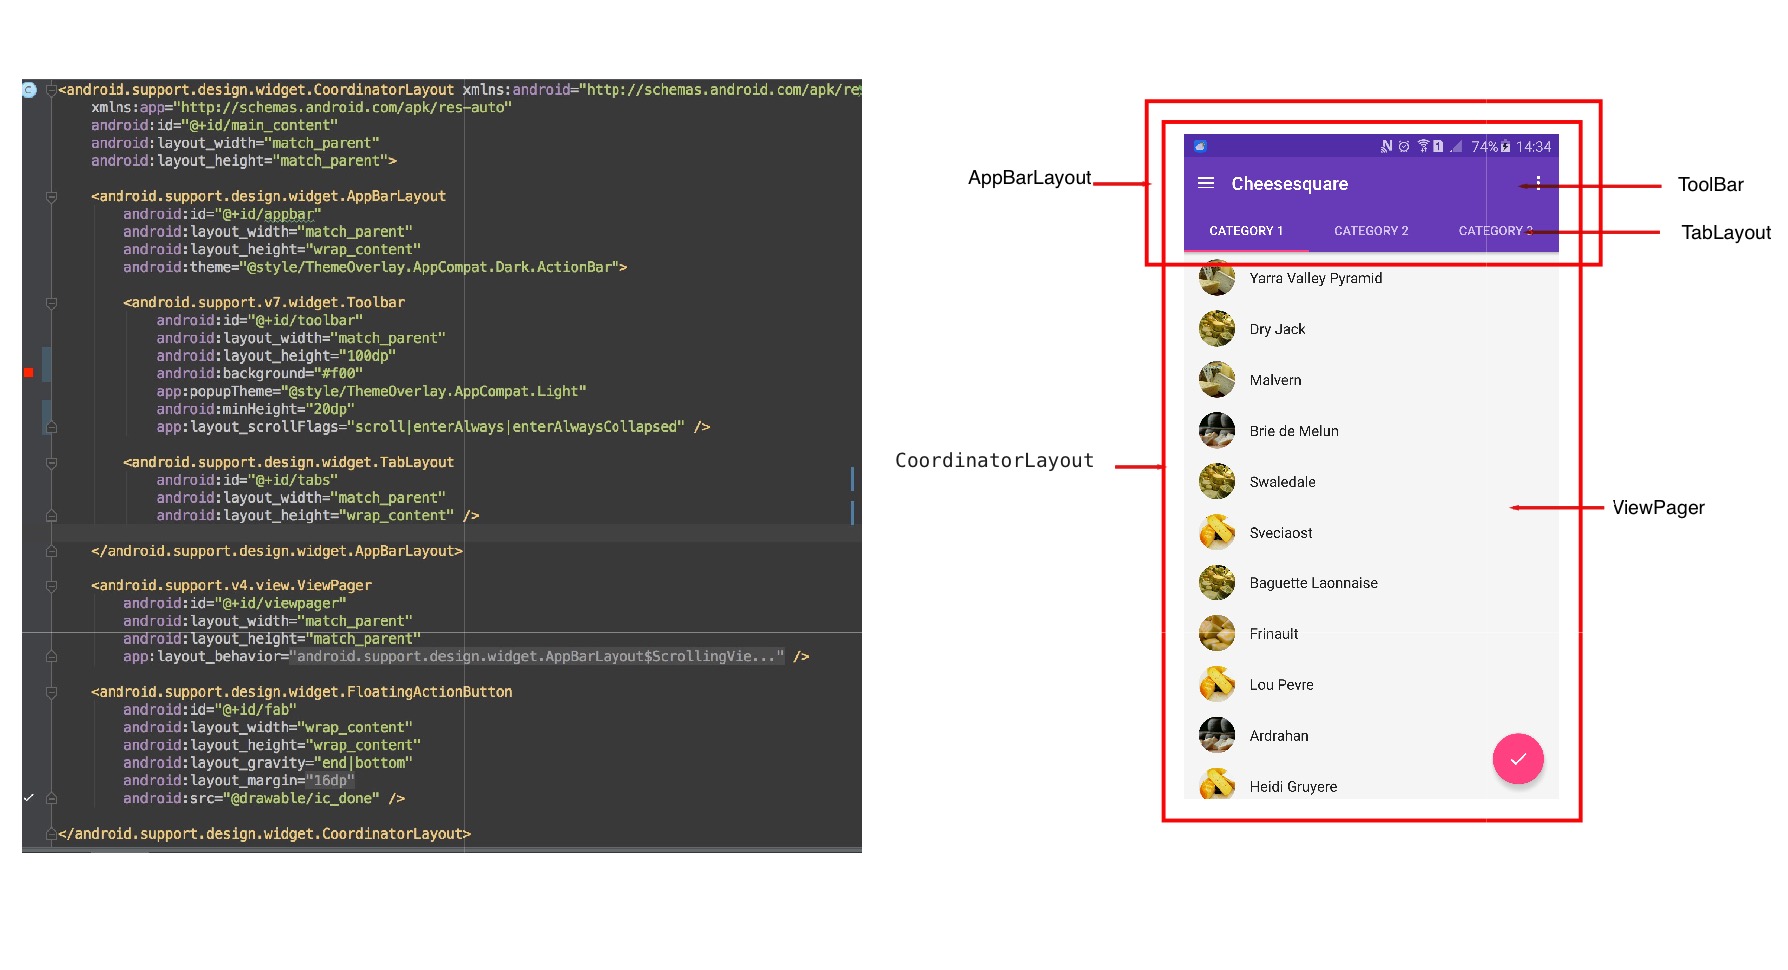
看看这个界面的实现,我们主要通过3个方面来了解,
- 子控件的宽高的测量
- 子控件的位置摆放
- 子控件的事件传递
1 测量:
因为它们的根控件是CoordinatorLayout .所以我们重点是放在
CoordinatorLayout 的onMeasure方法里面:1
2
3
4
5
6
7
8
9
10
11
12
13
14
15
16
17
18
19@Override
protected void onMeasure(int widthMeasureSpec, int heightMeasureSpec) {
/**
* 省略N多代码
*/
final Behavior b = lp.getBehavior();
if (b == null || !b.onMeasureChild(this, child, childWidthMeasureSpec, keylineWidthUsed,
childHeightMeasureSpec, 0)) {
onMeasureChild(child, childWidthMeasureSpec, keylineWidthUsed,
childHeightMeasureSpec, 0);
}
/**
* 省略N多代码
*/
setMeasuredDimension(width, height);
}
子控件的测量交给他们的Behavior,Behavior 不处理,交给CoordinatorLayout处理 ,Behavior 可以在attr中指定. 可以看出ViewPager的Behavior 是AppBarLayout$ScrollingViewBehavior
,我们进入ScrollingViewBehavior 中的onMeasureChild方法中1
2
3
4
5
6
7
8
9
10
11
12
13
14
15
16
17
18
19
20
21
22
23
24
25
26
27
28
29
30
31
32
33
34
35
@Override
public boolean onMeasureChild(CoordinatorLayout parent, View child,
        int parentWidthMeasureSpec, int widthUsed, int parentHeightMeasureSpec,
        int heightUsed) {
    final int childLpHeight = child.getLayoutParams().height;
    if (childLpHeight == ViewGroup.LayoutParams.MATCH_PARENT
            || childLpHeight == ViewGroup.LayoutParams.WRAP_CONTENT) {
     /**
     * 省略N多代码
     */


    if (availableHeight == 0) {
       // If the measure spec doesn't specify a size, use the         current height
         availableHeight = parent.getHeight();
     }
     final int height = availableHeight - header.getMeasuredHeight()
                    + getScrollRange(header);
      final int heightMeasureSpec = View.MeasureSpec.makeMeasureSpec(height,
                    childLpHeight == ViewGroup.LayoutParams.MATCH_PARENT
                            ? View.MeasureSpec.EXACTLY
                            : View.MeasureSpec.AT_MOST);

            // Now measure the scrolling menu with the correct height
      parent.onMeasureChild(child, parentWidthMeasureSpec,
                    widthUsed, heightMeasureSpec, heightUsed);

            return true;
        }
    }
    return false;

}
可以看出来当你的ViewPager的高度不设置固定的值得话,他的高度会被ScrollingViewBehavior重新赋值,高度为CoordinatorLayout的高度减去AppBarLayout的可滑动范围.(既getTotalScrollRange())
可以看出:当前的ViewPager 的高度比我们当前屏幕上看的要高一点.
AppBarLayout 里面有3个范围比较有意思.getTotalScrollRange():表示总共可以滑动的范围
它是计算所有layout_scrollFlags标有scroll 的View 的高度减去所有同时标有scroll 和 exitUntilCollapsed 的 View 的最小高度.
getDownNestedPreScrollRange():表示当向下滑动可以滑动的范围.
它计算了所有layout_scrollFlags同时标记scroll 和 enterAlways 同时不标记 enterAlwaysCollapsed的View 的高度 加上既标记了scroll 和 enterAlways又标记了enterAlwaysCollapsed 的最小高度.
产生的效果是:在下滑的过程中AppBarLayout残留在屏幕上的最小高度为 AppBarLayout本身的高度减去getDownNestedPreScrollRange()的高度.
getUpNestedPreScrollRange():表示当向上滑动可以滑动的范围.
这里返回的是getTotalScrollRange().
产生的效果是:在上滑的过程中AppBarLayout残留在屏幕上的最小高度为 AppBarLayout本身的高度减去getUpNestedPreScrollRange()的高.
而这三种范围构成了 AppBarLayout 在 RecyclerView 滑动事件的滑动效果.
主意点:
- exitUntilCollapsed只有和scroll一起组合才会有效果;
- enterAlwaysCollapsed 要和scroll 和enterAlways一起使用才有效果.
- 官方说要把带有scroll flag的view放在前面,这样收回的view才能让正常退出,而固定的view继续留在顶部。
那是因为AppBarLayout 是一个 LinearLayout 布局.最后留在屏幕上的东西是 AppBarLayout 的底部,所以需要把要固定的 View 放在最后. - 这里所有的 View 都是 AppBarLayout 的一级 View.二级不太考虑当中,
下面放出几个例子来加深大家对layout_scrollFlags和3中范围的理解.
第一中 正常情况(scroll):1
2
3
4
5
6
7
8
9
10
11
12
13
14
15
16
17
18
19
20<android.support.design.widget.AppBarLayout
android:id="@+id/appbar"
android:layout_width="match_parent"
android:layout_height="wrap_content"
android:theme="@style/ThemeOverlay.AppCompat.Dark.ActionBar">
<android.support.v7.widget.Toolbar
android:id="@+id/toolbar"
android:layout_width="match_parent"
android:layout_height="100dp"
android:background="#f00"
app:popupTheme="@style/ThemeOverlay.AppCompat.Light"
app:layout_scrollFlags="scroll" />
<android.support.design.widget.TabLayout
android:id="@+id/tabs"
android:layout_width="match_parent"
android:layout_height="wrap_content" />
</android.support.design.widget.AppBarLayout>
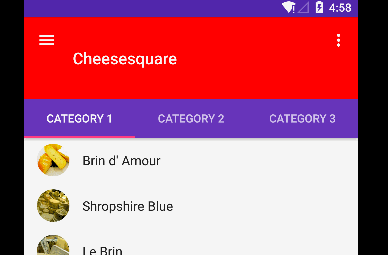
第2种(minHeight +scroll +exitUntilCollapsed)1
2
3
4
5
6
7
8
9
10
11
12
13
14
15
16
17
18
19
20
21<android.support.design.widget.AppBarLayout
android:id="@+id/appbar"
android:layout_width="match_parent"
android:layout_height="wrap_content"
android:theme="@style/ThemeOverlay.AppCompat.Dark.ActionBar">
<android.support.v7.widget.Toolbar
android:id="@+id/toolbar"
android:layout_width="match_parent"
android:layout_height="100dp"
android:background="#f00"
app:popupTheme="@style/ThemeOverlay.AppCompat.Light"
android:minHeight="20dp"
app:layout_scrollFlags="scroll|exitUntilCollapsed" />
<android.support.design.widget.TabLayout
android:id="@+id/tabs"
android:layout_width="match_parent"
android:layout_height="wrap_content" />
</android.support.design.widget.AppBarLayout>
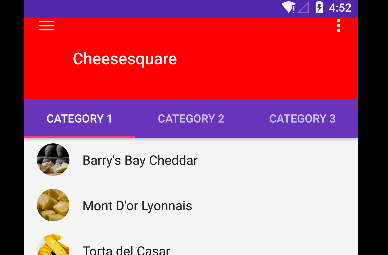
第3种(minHeight +scroll +enterAlways+enterAlwaysCollapsed)1
2
3
4
5
6
7
8
9
10
11
12
13
14
15
16
17
18
19
20
21
22
<android.support.design.widget.AppBarLayout
    android:id="@+id/appbar"
    android:layout_width="match_parent"
    android:layout_height="wrap_content"
    android:theme="@style/ThemeOverlay.AppCompat.Dark.ActionBar">

    <android.support.v7.widget.Toolbar
        android:id="@+id/toolbar"
        android:layout_width="match_parent"
        android:layout_height="100dp"
        android:background="#f00"
        app:popupTheme="@style/ThemeOverlay.AppCompat.Light"
        android:minHeight="20dp"
        app:layout_scrollFlags="scroll|enterAlways|enterAlwaysCollapsed" />

    <android.support.design.widget.TabLayout
        android:id="@+id/tabs"
        android:layout_width="match_parent"
        android:layout_height="wrap_content" />

</android.support.design.widget.AppBarLayout>
2 位置摆放
同样进入CoordinatorLayout 的onLayout方法1
2
3
4
5
6
7
8
9
10
11
12
13
14
15
@Override
protected void onLayout(boolean changed, int l, int t, int r, int b) {
    final int layoutDirection = ViewCompat.getLayoutDirection(this);
    final int childCount = mDependencySortedChildren.size();
    for (int i = 0; i < childCount; i++) {
        final View child = mDependencySortedChildren.get(i);
        final LayoutParams lp = (LayoutParams) child.getLayoutParams();
        final Behavior behavior = lp.getBehavior();

        if (behavior == null || !behavior.onLayoutChild(this, child, layoutDirection)) {
            onLayoutChild(child, layoutDirection);
        }
    }
}
同样可以看到它也是先让Behavior处理.不处理才是CoordinatorLayout自身去处理.
同样我们为了查看ViewPager 的摆放,我们进入ScrollingViewBehavior 中的onLayoutChild方法中.1
2
3
4
5
6
7
8
9
10
11
12
13
14
15
16@Override
public boolean onLayoutChild(CoordinatorLayout parent, View child, int layoutDirection) {
// First lay out the child as normal
super.onLayoutChild(parent, child, layoutDirection);
// Now offset us correctly to be in the correct position. This is important for things
// like activity transitions which rely on accurate positioning after the first layout.
final List<View> dependencies = parent.getDependencies(child);
for (int i = 0, z = dependencies.size(); i < z; i++) {
if (updateOffset(parent, child, dependencies.get(i))) {
// If we updated the offset, break out of the loop now
break;
}
}
return true;
}
先调用的父类的onLayoutChild 的方法.然后根据dependencies (其实就是AppBarLayout)的getTopBottomOffsetForScrollingSibling(),其实就是把ViewPager放在AppBarLayout的下方.
3 事件传递
Touch事件的话
CoordinatorLayout是会在onInterceptTouchEvent 对所有的携带Behavior的第一级View 发送通知.如果被哪一个Behavior的onInterceptTouchEvent 的拦截,所以的后续的 Touch动作都分发给这个Behavior.
注意点:
能接受到事件只有第一级的并且携带Behavior的控件.
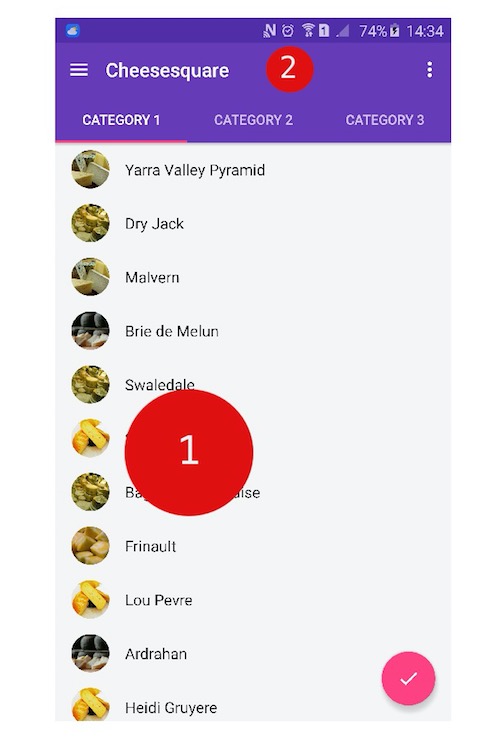
同时这个事件是通知给所有的携带Behavior的控件,也就是说当你的点击事件不在这个 View 的上方,只要这个View 有携带 Behavior 都会收到通知,就是说不管你是点击屏幕上的1还是2,AppBarLayout 都会收到onInterceptTouchEvent事件,所以在复写 Behavior 的onInterceptTouchEvent 要特别注意到这个情况.
比如说界面一开始往上滑动. 这个时候点击事件是被AppBarLayout的Behavior 拦截的. AppBarLayout的Behavior事件会设置AppBarLayout的setTopAndBottomOffset ,使AppBarLayout产生了往上偏移,所以你可以看到AppBarLayout 往上偏移,那么ViewPager 为啥也向上偏移.因为ViewPager的ScrollingViewBehavior 中1
2
3
4
5@Override
public boolean layoutDependsOn(CoordinatorLayout parent, View child, View dependency) {
// We depend on any AppBarLayouts
return dependency instanceof AppBarLayout;
}
对AppBarLayout 进行关联,当AppBarLayout 有变化的时候会通知给
ScrollingViewBehavior 的onDependentViewChanged 方法中.
通过在这个方法中进行对ViewPager的位置也进行偏移.使他们一起往上偏移.所以看起来想两个一起往上偏移,这个也是酷酷的.
Scroll 事件
当Touch 事件在ViewPager中. 因为ViewPager中的使用的RecyclerView控件,而RecyclerView 是使用Nest来和其他控件一起处理Scroll事件.RecyclerView 的Nest的事件会一层一层的上传Scroll 事件,被最近的NestedScrollingParent 接受,这里是CoordinatorLayout ,CoordinatorLayout是一个协调者的角色,他将Nest的事件分发给子控件的View的Behavior处理.
在这里都会被AppBarLayout的Behavior接受.它会根据getTotalScrollRange,getDownNestedPreScrollRange,getUpNestedPreScrollRange来进行想对应的偏移. 效果在上面已经讲了.
关于Nest 来处理 Scroll 事件:
当 NestedScrollingChild(下面用Child代替) 要开始滑动的时候会发送 onStartNestedScroll 请求给最近的NestedScrollingParent(下面用Parent代替). 当onStartNestedScroll 返回 true 表示同意一起处理 Scroll 事件的时候时候Child会发送onNestedScrollAccepted 通知 让Parent去做一些准备动作,当Child 要开始滑动的时候,会先发送onNestedPreScroll 请求给Parent ,告诉它我现在要滑动多少米了,你觉得行不行,这时候Parent 根据实际情况告诉Child 现在只允许你滑动多少.然后 Child 根据 onNestedPreScroll 中传递回来的信息对滑动距离做相对应的调整.在滑动的过程中 Child 会发送onNestedScroll通知告知Parent 当前 Child 的滑动情况. 当要进行滑行的时候,会先发送onNestedFling 请求给Parent,告诉它 我现在要滑行了,你说行不行, 这时候Parent会根据情况告诉 Child 你是否可以滑行. Child 通过onNestedFling 返回的 Boolean 值来觉得是否进行滑行.如果要滑行的话,会在滑行的时候发送onNestedFling 通知告知 Parent 滑行情况.当滑动事件结束就会发送onStopNestedScroll 通知 Parent 去做相关操作.
注意点:
- Parent 告知 Child 现在允许你滑动多少是通过
onNestedPreScroll中的数组int[] consumed ,consumed[0]表示 Parent 在 X 轴消耗的量, 所以 Child 滑动距离是请求X轴的滑动距离上面减少consumed[0],consumed[1]表示 Y轴上面的消耗.
因为consumed是数组,所以Child可以完成可以拿到数据,而不需要onNestedPreScroll 的返回值.
- 重点注意讲解中的请求和通知.
尾巴
详情界面我也大概看了一遍..机制差不多,其实就是多了CollapsingToolbarLayout这个的好玩的控件.所以这个学习笔记不一定有2.